Monday, August 24, 2015

Hello World with LCD Keypad Shield #Learn Arduino

I already found very useful code to display the character with the LCD.


Happy share :)

Saturday, August 22, 2015

Playing The Melody


This weekend I added up some instrument called piezo buzzer. We can play the tone, and as the beginner I started with the example from here . The copied code is here


Friday, August 7, 2015

Controlling the LED Brightness #Learn Arduino


Finally I can go up from blink to another basic of Arduino. In this circuit we can control the brightness of LED with potentiometer.LED brightness is determined from the position knob on the potentiometer.

Some material we need:
  • Arduino (I am using Arduino UNO)
  • LED
  • Potentiometer 10K ohm
  • 330 Ohm resistor
  • PC/laptop
  • Breadboard
  • 6 jumperwire
  • Data cable from Arduino to PC 
 Here is the code that we can simply copying from Arduino IDE example:


the new things we learn in here is "sensorPin =A0". It means that we select the input pin for the potentiometer. To read the value from the sensor we just type "sensorValue = analogRead(sensorPin);"  inside the loop.

Monday, August 3, 2015

Blink LED #Learn Arduino

Up from hello world, now we go little bit further to make the LED blinking.

Some material we need:
  • Arduino (I am using Arduino UNO)
  • LED
  • 330 Ohm resistor
  • PC/laptop
  • Breadboard
  • 3 jumperwire
  • Data cable from Arduino to PC
This is the code, and it's available on the example of Arduino IDE Software with title "Blink"


"high" means 5V supply and make the LED is ON and
"low" meand 0V supply and make the LED is OFF.

The LED will be ON and OFF repeatedly every 1 second  that's because we put the code on the loop.

Sunday, August 2, 2015

Hello World Repeated #Learn Arduino

Modifying from the previous, here I would like to make the "hello world"  appear repeatedly.

---------------------------------------------------------------------------------------------------

//Learn Arduino-Hello world Repeatedly-Hanifadinna

void setup () {
  Serial.begin(9600); //open serial port with speed 9600 bit per second
}

void loop () {
 delay(10000);  // delay time 10 second
 Serial.println("Hello world");  //print out the hello world
}
---------------------------------------------------------------------------------------------------
 Verivy, uplod and we just simply type "ctrl+shift+M" to show the print of "hello world", and then we got this from serial monitor.


To make the hello world appear repeatedly is because we put :

 delay(10000);  // delay time 10 second
 Serial.println("Hello world");  //print out the hello world

inside the void loop, so the hello world will appear repeatedly every 10 second. 

Thursday, July 23, 2015

Hello World #Learn Arduino

The first time we practicing programming ussually with "hello world". Since Arduino both hardware and software, here is how to hello world in Arduino

---------------------------------------------------------------------------------------------------

//Learn Arduino-Hello world

void setup () {
  Serial.begin(9600);//open serial port with speed 9600 bit per second
  delay(10000); // delay time 10 second
  Serial.println("Hello world"); //print out the hello world
}

void loop () {}

---------------------------------------------------------------------------------------------------
 verivy, uplod and we just simply type "ctrl+shift+M" to show the print of "hello world", and then we got this from serial monitor


Saturday, July 18, 2015

Arduino

Arduino UNO

Gambar diatas kita sebut sebagai perangkat keras (hardware Arduino). Pertama kali dibuat di Italia.

Perangkat seperti apakah Arduino?

Arduino dibangun diatas platform komputasi fisik yang bersifat open source (gratis dan dapat dibangun secara bersama-sama).  Dengan arduino kita dapat mengatur lampu agar mati dan hidup secara otomatis, mengatur tingkat kecepatan motor,mengatur derajat putaran lengan robot, dll. Dari contoh tersebut kita dapat menyimpulkan bahwa Arduino merupakan suatu perangkat yang dapat mengontrol atau mengatur suatu sistem (Kontroler). Pekerjaan dengan menggunakan Arduino ini dapat dikombinasikan dengan software lain seperti Flash, Processing Max/MSP dll.

Arduino juga disebut sebagai perangkat interaktif yang kerjanya yang mampu merasa dan mengontrol (sense and control) suatu sistem.

Perangkat interaktif ini merupakan suatu rangkaian elektronika yang dapat digunakan untuk merasakan adanya perubahan lingkungan melalui  sensor yang mampu menerima informasi/input dari lingkungan. Informasi diterima dan diolah oleh Arduino untuk kemudian dijalankan berdasarkan perintah yang diprogram ke dalam bahasa Arduino. Perintah pada akhirnya dijalankan oleh aktuator.

Untuk membuat sistem yang dapat merasa dan mengontrol (sense and control) kita harus mengenal bahasa pemrograman Arduino. Seperti kata Nelson Mandela "If you talk to a man in a language he understand, that goes to his head, if you talk to a man in his language that goes to his heart". Begitu pula dalam mengenal Arduino, kalau ingin paham betul kita harus juga memahami bahasa Arduino yang berbasiskan bahasa C.


Monday, July 13, 2015

Menentukan resistor untuk LED


Awalnya dalam merangkai sebuah rangkaian listrik  saya bertanya-tanya bagaimana seseorang bisa menentukan besar resistor 330 ohm, 1000 ohm, 1k ohm dll yang digunakan dalam rangkaian. 
Sebelum menentukan berapa besar kebutuhan resistor yang akan digunakan, ada beberapa hal yang harus kita perhatikan, antara lain : 
  • Jenis LED apa yang  digunakan? 
  • berapa besar catu daya  (power supply) rangkaian yang tersedia?
  • Rangkaian dipasang secara seri ataukah paralel?
Ada rumus sederhana yang telah kita kenal sejak duduk di bangku SMP yaitu Hukum Ohm
V=I x R
dengan,
V = tegangan (volt)
I=arus (Ampere)
R = hambatan (ohm). 

Untuk mendapatkan nilai V, kita harus mengetahui terlebih dahulu tegangan dari catu daya yang tersedia, dan tegangan dari LED itu sendiri.


Misalnya kita menggunakan 2 battere yang dipasang secara seri dengan tegangan masing-masing 1,5 V dan kita akan memasang LED berwarna merah pada rangkaian. 

LED memiliki karakteristik yang disebut sebagai forward voltage(Vf) atau tegangan maju. Vf adalah jumlah tegangan yang hilang pada LED ketika beroperasi pada standar arus tertentu. Setiap warna LED memberikan nilai Vf yang berbeda-beda. Vf LED merah, hijau, biru dari informasi data sheet adalah 1,8V. Sehingga berdasarkan Hukum Ohm, maka nilai V adalah:
Vcatu daya - Vf = 3V-1,8 V=  1,2 V. 

Bagaimana dengan nilai I?. 
LED memiliki maximum continued current rating  (If atau Imax. Berdasarkan data sheet yang saya dapatkan klik disini nilai If = 20mA.

Maka nilai R adalah:

1,2 V = 20mA x R 
R = 1,2 V / (20x0,001A)
R=   60 ohm

Lalu bagaimana jika kita salah dalam memilih atau kurang tepat. Hal ini masih bisa ditoleransi dengan nilai sebesar ±5%. Dan untuk pertimbangan keamanan kita dapat memilih nilai resistor yang lebih tinggi misalnya 63 ohm atau 75 ohm atau bisa juga 100 ohm.

Selamat memilih LED yang sesuai dengan kebutuhan :)


Tuesday, May 12, 2015

Apakah itu Programmable Logic Control (PLC)?

Menurut The Association of Electrical Equipment and Medical Imaging Manufacturers (NEMA)

"PLC is defined as a digital electronic device with a programmable memory for storing instructions that execute specific functions such as logic, sequence, timing, counting, and arithmetic to control an industrial machine or process accordance with the desired industri" 

Jadi PLC ini adalah suatu perangkat elektronik yang bekerja secara digital, dapat diprogram karena di dalamnya terdapat mikroprosesor dan memory untuk menyimpan perintah-perintah dalam mengeksekusi fungsi-fungsi seperti logika, sequence, timing, counting, dan fungsi-fungsi aritmatika yang tujuannya adalah mengontrol mesin-mesin maupun proses yang diinginkan.  

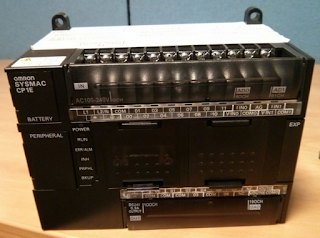
Gambar di bawah ini adalah salah satu PLC yang saya gunakan

PLC tipe analog